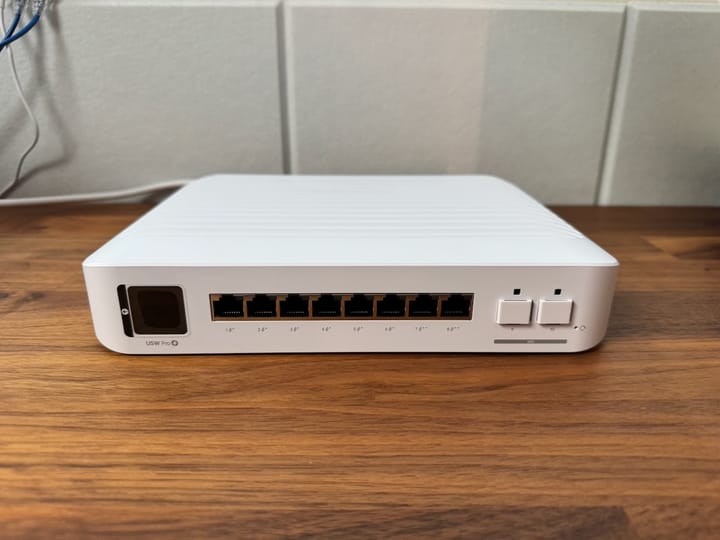
• Skip to primary navigation
  • Skip to main content
  • Skip to primary sidebar

Rowell Dionicio

Get Techie With It

  • Home
  • About
  • Newsletter
  • Resources
    • Archives
    • Book List
    • YouTube
  • Learn
    • Wi-Fi 6E
    • CCNP Enterprise Core
    • DevNet Associate
    • PCNSA Certified
  • Blog
  • Contact
  • Show Search
Hide Search

unifi

UniFi Switch Port Profiles

November 24, 2020 By Rowell 8 Comments

Consistency in configuration is key for management and troubleshooting. The UniFi platform allows the configuration of Profiles. I’ll be looking at Switch Port Profiles in order to quickly set parameters to a switch port with just a drop down option.

In my lab, I have an 8-port UniFi switch, UniFi Cloud Key Gen2 Plus, and a UniFi Security Gateway (USG).

As an example, let’s say there’s an environment where many access points will connect. In my Wi-Fi network I’ll have two SSIDs broadcasting, both on different subnets. Rather than going every single port, converting it to a trunk and allowing the specific VLANs, I’d like to just select a Switch Port Profile to configure that all for me.

Log into your UniFi dashboard and click on the Gear icon located on the bottom left of the window. Once the Settings page is available, on the left navigation under Settings, click on Profiles.

Profiles has two sections, RADIUS and Switch Ports. Click on Switch Ports.

I already have Switch Port profiles configured. But we’ll add a new one for this example. On the bottom, click on Add New Port Profile.

Next, we enter the various parameters for our UniFi Switch Port Profile. Give it a descriptive name. Since I’m configuring this profile for access points I will enable PoE/PoE+.

My access points will be plugged into a trunk port. I’ll need to set the Native VLAN or what UniFi calls the Native Network. I like to place all my access points on my infrastructure VLAN which I’ve selected in the drop down. 

Next, we tag the networks we want to include on this trunk. These are the two networks I’ll map to my SSIDs.

The other settings I’ll leave as default. But we could modify settings such as the Link Speed or maybe set up Storm Control. There have been scenarios where I’ve needed to set a threshold for multicast or broadcast.

Once finished, click on Save.

Now it’s time to use this Switch Port Profile. I head over to  Devices and select my UniFi switch. 

I see see switch ports I can modify. Select one of the ports to bring up the menu so we can modify the settings.

Hover over the port you want to configure and click on the pencil icon to modify.

Within the individual switch port, we can select a Switch Port Profile, the one we just configured, in the drop down menu.  Select this profile and click on Apply.

The switch port is now configured as a trunk with the requirements we need to properly allow the broadcast and operation of our Wi-Fi network. 

Switch Port Profiles can be configured to your requirements. In my example, I used access points. But maybe you have a set of different server port configurations. Configure the Switch Port Profile and now it’s much simpler, efficient, and clean to set the port configuration. 

Sure, you can set up the port to be a trunk allowing all VLANs, but why should you allow VLANs on a port that isn’t required to be on? 

UniFi – USG Pro – Configuring Remote Access VPN

March 7, 2020 By Rowell 11 Comments

The Ubiquiti UniFi Security Gateway (USG) Pro makes a great VPN terminator and is ideal firewall for small and medium business. Occasionally, I am configuring the USG Pro for my clients to protect their networks, be the gateway of their network, and also provide VPN capability.

In this guide, I will show you how to configure a Remote Access VPN on the Ubiquiti USG Pro using L2TP. In this setup, I am using the Cloud Key G2 to manage a Ubiquiti USG Pro.

What is L2TP?

Layer 2 Tunneling Protocol (L2TP) is a tunneling protocol used in VPNs. It needs an encryption protocol to protect the traffic being sent through the L2TP tunnel. Read more here.

There are a few components needed to make this work

  • RADIUS Server (on the USG)
  • RADIUS User
  • VPN Network (on the USG)
  • Firewall Rules (allowing L2TP VPN)
  • Device configuration

RADIUS User Configuration

To log in remotely via VPN, you need an account. The first step is to log into your USG or your UniFi management.

Go to Settings and then click on Services

Under RADIUS and Users, click on Create New User.

RADIUS Users

Type out the account name for this user and give it a strong password. (Make sure you keep that in your password manager). Leave the VLAN section blank.

For Tunnel Type, select 3 – Layer Two Tunneling Protocol (L2TP)
For Medium Type, select 1 – IPv4
Click Save

RADIUS Server Configuration

We will need to configure a RADIUS Server on the Ubiquiti USG in order to accept remote VPN connections from various users that we can set up for remote access.

Under RADIUS and Server enable RADIUS Server. Below that, type in a strong Secret and make sure you document that in your password manager.

Leave the defaults for the rest of the options. Then click on Apply.

RADIUS Server Configuration

Configure a Remote Access VPN Network

When users VPN into the network, we need to place them on their own subnet. On the left side navigation, under Settings, click on Networks.

Click on Create a New Network.

Networks

Give the network a descriptive name such as Remote User VPN

For purpose, select Remote User VPN. This will allow us to select a VPN Type.

For VPN Type, select L2TP Server.

Create a strong Pre-Shared Key (You’ll need this key later when configuring your device for remote VPN)

Give the Remote User VPN network a Gateway/Subnet (Do not overlap this with any preconfigured networks. This is a new network.

For Name Server, select auto or manual. Under Manual you will specify the name servers.

Under RADIUS, select the Default RADIUS profile

Click Save

Configuring a Remote User VPN Network

When you selected Remote User VPN and saved the network, it creates the necessary Firewall rules to allow L2TP VPN. View it under Routing & Firewall > Firewall > Rules IPv4 > WAN LOCAL

Firewall Rules for L2TP VPN

Create VPN Profile on Computer

I use macOS so these instructions are specific. Once I get a hold of my Windows Laptop and update it I’ll add a section for Windows.

In macOS we will use the built-in L2TP VPN capabilities.

Open Network Preferences
Click on the + icon on the bottom left to add a new VPN interface

Under Interface, select VPN
For VPN Type, select L2TP over IPsec
Create a descriptive name under Service Name
Click Create

In the configuration of the VPN profile, keep Configuration at Default.

For the Server Address, set the IP address of your USG’s WAN interface

For account name, set it to the RADIUS user you created earlier

Click on Authentication Settings button

For Password, enter the password of the RADIUS user

Under Machine Authentication, select Shared Secret enter the Shared Secret of the RADIUS Server.

Click OK

Configure your user password and the shared secret of the RADIUS server

Back at the VPN Profile configuration window, click Advanced

Under Options, enable “Send all traffic over VPN connection” if you’d like to make this a Full VPN Tunnel.

Click OK and then click on Apply

L2TP VPN Options

Test Remote Access VPN

Click on Connect

If successful, status will change to Connected, you’ll see how long you’ve been connected, and you’ll have an IP address from when you configured it on the Remote Access VPN network.

macOS L2TP over IPSec configuration

Now try accessing your local resources.

At the time of this writing, Ubiquiti doesn’t offer any way to easily see the status of remote access VPN users on the GUI dashboard.

The closest thing is an Event where my laptop shows that it has connected to the LAN, but you would assume that’s a local Ethernet connection.

My laptop, cts, connecting via remote VPN but triggering this event notification

The only way to tell the status is through the CLI of the USG using show vpn remote-access and show vpn ipsec sa

$ show vpn remote-access
Active remote access VPN sessions:

User       Time      Proto Iface   Remote IP       TX pkt/byte   RX pkt/byte
-------- – – ----- – – - – – - –   – ----------- – – -- – – -- – – -- – – ----
rowell     00h00m14s L2TP  l2tp0   192.168.3.1       326 105.5K    425  62.0K

The Remote IP is the Remote VPN network that I created earlier.

$ show vpn ipsec sa
remote-access: #6, ESTABLISHED, IKEv1, 5df87ceee4a88d30:ba926ce41288578c
  local  ‘x.x.x.x’ @ x.x.x.x
  remote '172.20.3.6' @ 12.9.250.183
  AES_CBC-256/HMAC_SHA1_96/PRF_HMAC_SHA1/MODP_2048
  established 330s ago
  remote-access: #7, INSTALLED, TRANSPORT-in-UDP, ESP:AES_CBC-128/HMAC_SHA1_96
    installed 330 ago
    in  c7a3bef9, 1458020 bytes,  9236 packets,     0s ago
    out 0e0bf674, 9496201 bytes, 10136 packets,    29s ago
    local  x.x.x.x/32[udp/l2f]
    remote 12.9.250.183/32[udp/51184]

I’ve sanitized the local IP address. The local address is the WAN of the USG.
The remote IP address is my private IP and what my WAN IP is at the hotel I’m at.

For troubleshooting purposes, you could issue show vpn log tail to see the last 10 VPN log messages. tail is optional, it will continue to update the last 10 log messages and you can use that for troubleshooting someones connection.

$ show vpn log tail
Mar  7 07:10:12 12[IKE] <remote-access|6> closing CHILD_SA remote-access{7} with SPIs c7a3bef9_i (1548107 bytes) 0e0bf674_o (9631239 bytes) and TS x.x.x.x/32[udp/l2f] === 12.9.250.183/32[udp/51184]
Mar  7 07:10:12 04[IKE] <remote-access|6> deleting IKE_SA remote-access[6] between x.x.x.x[x.x.x.x]...12.9.250.183[172.20.3.6]
Mar  7 07:10:15 08[KNL] interface l2tp0 deleted
Mar  7 07:10:56 07[IKE] <7> 12.9.250.183 is initiating a Main Mode IKE_SA
Mar  7 07:10:57 04[IKE] <remote-access|7> IKE_SA remote-access[7] established between x.x.x.x[x.x.x.x]...12.9.250.183[172.20.3.6]
Mar  7 07:10:57 02[IKE] <remote-access|7> CHILD_SA remote-access{8} established with SPIs cb2f14f2_i 02e5c731_o and TS x.x.x.x/32[udp/l2f] === 12.9.250.183/32[udp/64282]
Mar  7 07:11:00 16[KNL] 10.255.255.0 appeared on ppp0
Mar  7 07:11:00 06[KNL] 10.255.255.0 disappeared from ppp0
Mar  7 07:11:00 05[KNL] 10.255.255.0 appeared on ppp0
Mar  7 07:11:00 02[KNL] interface l2tp0 activated

Thoughts

Overall, it was simple to configure remote access VPN if you are familiar with configuring it on other network devices. Ubiquiti could help others with a more simplified wizard to eliminate the number of sections you need to jump through to complete remote access VPN.

Additionally, Ubiquiti needs to add a status of remote VPN users in their dashboard to avoid having to use the CLI.

UniFi Adoption

November 13, 2018 By Rowell Leave a Comment

There is a strong demand for affordable enterprise-grade wireless solutions. Ubiquiti UniFi appears to be filling that need. 

Ubiquiti may be well known for their point-to-point products but recently, there’s been a decline in that product line and a gigantic increase in the UniFi solution. UniFi rivals the larger enterprise wireless providers but offers it at a reasonable price.

A lower price point is enticing enough for many customers. UniFi access points are in the sub-$1k range which doesn’t break the budget.

Recently, Ubiquiti’s Q1 2019 earnings report was released and they saw an increase of 41.3% in revenue for the Enterprise technology segment. That brought the revenue up for that segment to $177.9 million. This includes UniFi, mFi, and AmpliFi products. This is a 15.1% increase in growth from Q1 2018! In Q3 2018, they grew 31.6%, to $149.5 million which was 60% of total sales!

The growth is explosive.

There’s no doubt, the UniFi management dashboard provides more than just the basics of wireless management. Ubiquiti is expanding it to become a true provider for high performing wireless networks.

UniFi’s Impact

I’m worried about poor wireless design. While UniFi may be affordable and easy to configure, it is equally easy to implement wireless incorrectly. High capacity and challenging environments need a proper wireless design to get the performance out of the investment. 

The other concern is quality. I’d like to test quality of the access points for myself. Stress tests with competitive access points should also be performed. If the performance is along the same lines as other vendors then we can say UniFi is making a dent in an industry largely dominated by big vendors. 

The Shift

Will we see a bigger shift in the wireless industry towards lower cost access points? Yes. I haven’t been impressed in code and hardware quality from the incumbent players. There’s plenty of room for someone to come along and cause disruption. Vendors must provide value beyond simple configuration. Attention must be spent on code quality and hardware to make a clear differentiation.

Primary Sidebar

Recent Posts

  • 6 GHz Frame Captures with EtherScope nXG
  • Manage Cisco Catalyst in the (Meraki) Cloud
  • Q1 2022 Income Report
  • First Look at Ekahau AI Pro – Network Simulator
  • PAN-OS Configuration Management – PCNSA

Categories

  • bschool
  • Certifications
  • Coding
  • DevNet Associate
  • Events
  • Lab
  • Networking
  • Personal
  • Podcasting
  • Professional
  • Reviews
  • Security
  • Short Stories
  • Uncategorized
  • Wireless

Archives

  • June 2022
  • May 2022
  • January 2022
  • December 2021
  • November 2021
  • August 2021
  • July 2021
  • April 2021
  • February 2021
  • January 2021
  • December 2020
  • November 2020
  • October 2020
  • September 2020
  • August 2020
  • June 2020
  • May 2020
  • April 2020
  • March 2020
  • February 2020
  • January 2020
  • December 2019
  • November 2019
  • October 2019
  • August 2019
  • June 2019
  • May 2019
  • April 2019
  • March 2019
  • February 2019
  • January 2019
  • November 2018
  • September 2018
  • August 2018

Copyright © 2022 · Written by Rowell Dionicio · You're awesome.


Loading Comments...